This page contains useful resources if you are using the mountains in winter for recreation or if you are a mountain professional leading others. I have been teaching winter skills for over 20 years including courses for private individuals, organisations, and also UIMLA International Mountain Leaders and other professionals. The resources here have developed from this experience and they are also linked to world leading research, tried and tested knowledge and best practice.
General Top Tips!
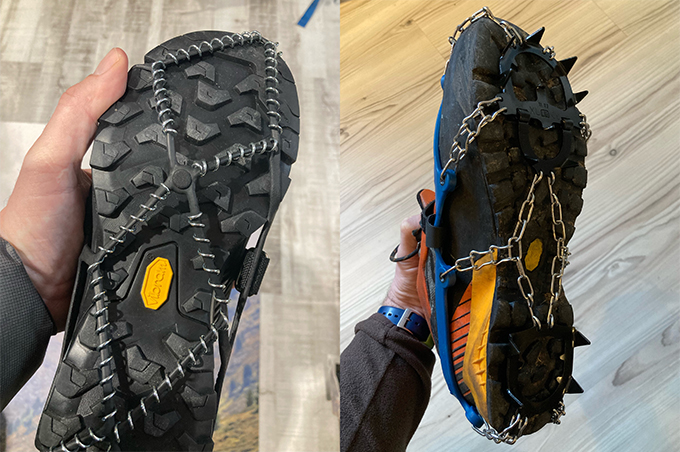
Below left: If you are looking to choose a pair of foot traction devices or “micro-spikes” then it is worth noting that the ones with wires coils (left hand picture), which are ok for running on flatter surfaces because of their low profile, do not offer any significant traction on smooth icy surfaces or in harder snow. A much better alternative for all-round mountain walking, in my opinion, are the models with real spikes (right hand picture). The example shown here are CAMP ICE MASTER that come in four sizes so you can be sure they fit your boot correctly. They are excellent on any walk and only weigh 500g a pair in the largest size.
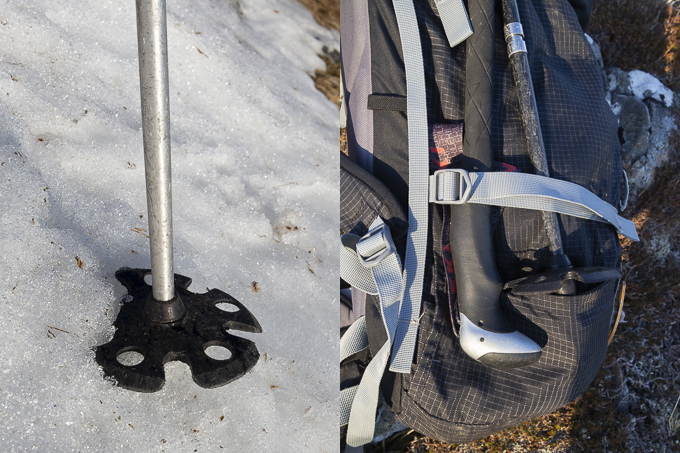
Below right: a great and simple modification to the large snow baskets on trekking poles for use on snow-covered terrain is to remove one of the ‘ears’. This way they bite much better into harder snow slopes and they also stow much more easily on the side of your rucksack with the pointy end down.
Avalanche Transceivers
This section is related to the knowledge and understanding of avalanche transceivers and using them as a mountain professional or for recreation. The videos below demonstrate a number of important knowledge areas and features of transceivers. You will also find information about transceiver checks with a group and more below.
Video (2m33s): How passive metal objects affect the electromagnetic field lines of the sending transceiver (and consequences for the seaching transceiver).
Video (3m42s): How a modern transceiver in search mode is designed to auto-revert to send after a period of passivity.
Video (2m31s): How to perform the ‘airport approach’ when searching with an avalanche transceiver. The video includes sideways ‘bracketing’ which is a leader or expert skill and would not be taught to novices unless on a extended companion rescue course or learning program.
Avalanche Transceiver Checks with Groups
This section gives guidance on how to perform checks of the transceivers you and your group are carrying so that you know they are functioning properly before a day of activity. Anybody who chooses to carry a transceiver should be familiar with how to check it’s functionality. Some checks should be done every morning and after longer stops. The checks only take a few minutes. When issuing transceivers to under 18’s, then the leader must have ‘eyes on’ all the individual units.
The picture below summarised the steps of a full transceiver check (steps 1 through 4). If all in the group are using modern transceivers that all have a ‘Group Check’ or ‘Partner Check’ functionality (effectively a “blinkered search mode”, then only steps 1, 3 and 4 are necessary. Steps 3 and 4 are commonly referred to as a ‘Double Group Check’. Following the checks, all members of the party should be in SEND mode before moving off.
Open a pdf file with guidance on how to perform avalanche transceiver checks with a group – page 1 is steps 1 & 2, page 2 is steps 3 and 4 without Group/Partner Check mode, and page 3 is steps 3 & 4 with Group/Partner Check mode.
The map below is an example of how you can shade slopes steeper than approximately 27 degrees (a gradient of 1m up for 2m along). The laminated helper has two thin black lines on it 2mm apart for this 1:50k map with 50m index contours (so 2mm is equal to 100m on the ground and if the index contours are closer than 2mm, the gradient is steeper than 27 degrees). The normal footpath to the summit of Ben Kilbreck (Meall nan Con) in Scotland is shown as the blue dashed line. You can see that in avalanche-prone conditions, this normal route would lead you onto dangerous slopes steeper than 27 degrees along the NW slopes of Creag an Lochain. In this case the alternative dotted route would be much more suitable. This illustrates how useful the map shading is for planning, but also when in the terrain and having to choose an alternative route.
Note that map shading – even digitally shaded slopes from various map applications – will not clearly identify small areas of steep terrain, such as a scoop measuring 25 x 25m (0.5 x 0.5mm on this map). Such small terrain traps can avalanche and hold enough snow to bury you. Therefore, the leader must always be aware of changes in terrain while on the move, and avoid even small terrain traps in snow-covered conditions.
Video (2m35s): How clients should learn to assemble avalanche probes and shovels so they remember. The video is a useful example of how complete novices can assemble shovels and probes without any previous training or experience. Note how the individuals help each other. This method means they will remember how to do it.
The next two documents are snow stability tests to test for weaknesses in the snowpack. Note that performing snow stability tests give results that only represent the immediate vicinity of the test site and results can vary. The tests can be used for training purposes (investigating a snow profile can provide a wealth of knowledge) and when traveling on snow-covered terrain where you don’t have access to an avalanche forecast. If you are traveling where there is an up-to-date avalanche and weather forecast, then these together with visual and audible clues on the hill, will give you 95% of the information you need to know about the snowpack.
The pdf file below has guidance to make a hand-shear test and a guide to looking at a snow profile.